To set up the IceTV Guide on your Microsoft Windows XP Media Center, please follow the simple instructions below. If you have any technical problems then please contact IceTV Support.
Note: The instructions below assume that you have already registered an account with IceTV and have selected which TV Guide region (EPG region) you would like to receive Guide data for. If you haven't done this or are unsure please go to My Account and select your region and time zone and then click "update".
Contents
- Downloading the IceTV software
- Configuring your Media Center for the IceTV Guide
- Scanning and editing TV channels
- Adding the Guide listings to channels
- Uninstalling
1. Downloading the IceTV software
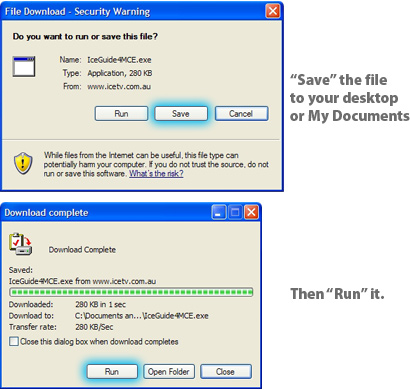
Click on the link below and select to "Save" the file to a known location on your media centre PC (eg Desktop or My Documents). Then select to "Run" the application.

You will be asked a few questions that will help the setup including your IceTV Member ID and Password. This account information will be stored in your media centre and used when trying to fetch the latest TV guide information.
Once this is complete you are ready to move onto the next step "Configuring your Media Center for IceTV".

2. Configuring your Media Center for the IceTV Guide
- Open the Media Centre application by pressing "START" on your remote control or by selecting "Media Center" in the "START" menu under "Programs" (bottom left-hand corner of screen).
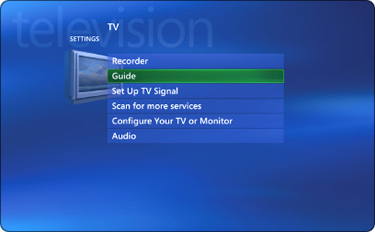
- Select "Settings" from the main menu. Then select "TV", and then "Guide".

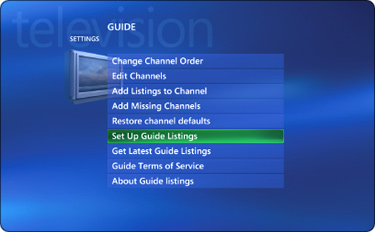
- Select "Setup Guide Listings".
- You will be asked if you wish to use the guide. Select "Yes" and click "Next".
- The MCE "Guide Terms of Service" will be displayed. Select "I agree" and click "Next".
- Enter your post code. Note: The post code you type in this box is irrelevant to Australian customers.

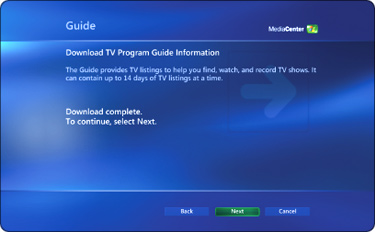
- It will then download the guide listings. When the download is complete, you should see "Download complete" displayed. Click "Next".
3. Scanning and editing TV channels
- Click "Start Scan" to start scanning for TV channels in your area.

- A confirmation screen will come up when complete which should look similar to the one below listing all the TV channels.
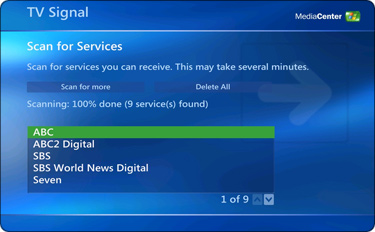
- Click "Next", then "Finish" to be taken back to the "Guide Settings" page.
- You may have a number of scanned channels that you do not need. To edit which channels are shown in the guide, select "Edit Channels". You should see a page similar to this one.
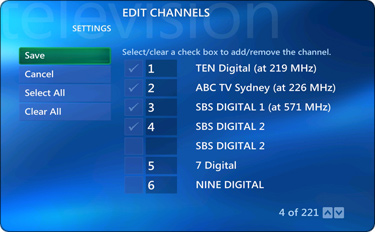
- Select and clear the check boxes to add or remove the channels shown in the guide. When finished, click "Save". To edit the order in which the channels are displayed in the guide, select "Change Channel Order". Click the up/down arrows to rearrange the channels. When finished, click "Save".
You are now ready to move onto the 4th and final step, "Adding IceTV guide listings to channels".
4. Adding the Guide listings to channels
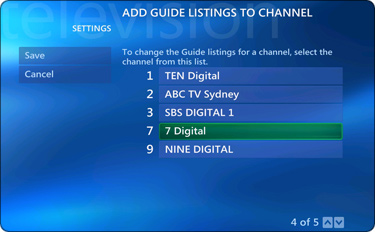
- Select "Add Listings to Channel". (If this option does not appear on the "Guide Settings" page after the first time you setup the guide, click the green left-arrow button to go back a page, and then select "Guide" again.) The list of scanned channels is displayed.
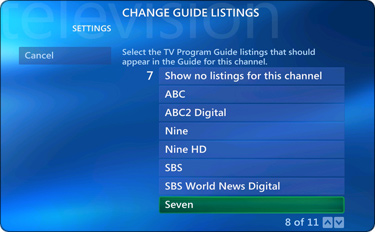
- Click each channel in the list that you want guide data to be shown for. Each time you select a channel, the list of guide channels will be displayed. Click on the guide channel that matches the scanned channel.
Note: Each guide channel can only be connected with one scanned channel. If you try to link it to a second scanned channel the first link will be lost. For example, the channel found during the scan might be "7 Digital", which should be connected to the guide channel named "Seven". When finished, click "Save".
You have now successfully completed IceTV's setup procedure for Windows XP Media Center Edition 2005 (MCE).
MCE will automatically update the IceTV Guide every 24 hours (starting from the most recent download) and inform you if any errors occur with the update.
To view the Guide, select the green square icon in the upper left-hand side of the screen to go back to the main page, and then select "My TV" and then "Guide".

You should see a screen similar to this.
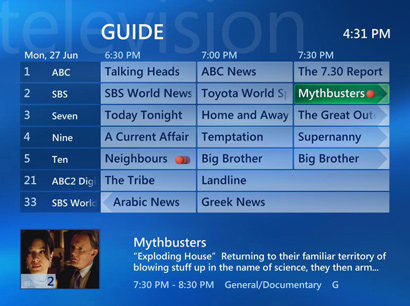
If you do not see any Guide data or a screen similar to this one please check that you have followed all the above steps correctly. If the problem still persists contact IceTV Support.
You are ready to move onto Setting up IceTV Interactive for XP Media Center Edition 2005 if you wish to use IceTV Smart Recording to manage your series recordings.
Uninstalling
If you wish to uninstall the IceTV Guide for MCE, simply download and run the uninstall file.