To set up the IceTV Guide on your Microsoft Windows 7, 8, 8.1 or 10 Media Center, please follow the simple instructions below. If you have any technical problems then please contact Customer Support.
Requirements
You obviously need a version of Windows (7 or later) that has Windows Media Center Installed. To check if your Windows version includes Media Center or has a download available see this Microsoft page.
Windows 10 users will need to install the unofficial and unsupported Windows 10 Media Center from the digitallife forum.
For Windows 8 Pro and 8.1 Pro if you don't already have Media Center installed you will need to download and install Microsoft's Windows Media Center Pack for your Windows version. If your Windows 8 or 8.1 version is not the Pro version you will need to upgrade to Windows 8.1 Pro via Microsoft's Windows 8.1 Pro Pack... and then install Microsoft's Windows Media Center Pack.
Or, apparently users of Windows 8.1 without Media Center can install the unofficial and unsupported Windows 10 Media Center from the digitallife forum but we have not tested it in Windows 8.1.
Note: The instructions below assume that you have already registered an account with IceTV and have selected which TV Guide region (EPG region) you would like to receive the IceTV Guide data for. If you haven't done this or are unsure please go to My Account and select your region and time zone and then click "update".
Do NOT install the IceTV Interactive application before you have successfully completed the Media Center Channel Scan (step 2. Configuring your Media Center).
If you have upgraded over an existing Windows installation to a newer version of Windows and you still have the old IceTV Interactive client installed this will need to be uninstalled first. This can be done via the "Uninstall a Program" option under Control Panel.
Contents
- Setup an IceTV Interactive Device
- Configuring your Media Center
- Downloading the IceTV software
- Configuring IceTV Interactive for Windows 7, 8, 8.1 or 10
- Checking the Guide and adding the Guide listings to channels
- Uninstalling
1. Setup an IceTV Interactive Device
- Log in to the My Account page on the IceTV website.
- Click on the "My Recorders" tab.
- In the bottom of the screen under "Add a Smart Recording Device" enter a name for you device in the box marked "Device label" (e.g. Lounge or MCE or Win10).
- Choose the correct device type of either "Microsoft Windows 7", "Microsoft Windows 8" or "Microsoft Windows 8.1" for Windows 8.1 and Windows 10.
- Click "Add".
- The page will refresh and you will get a confirmation message at the top saying "Device Added".
Once this is complete you are ready to move onto step 2 "Configuring your Media Center"

2. Configuring your Media Center
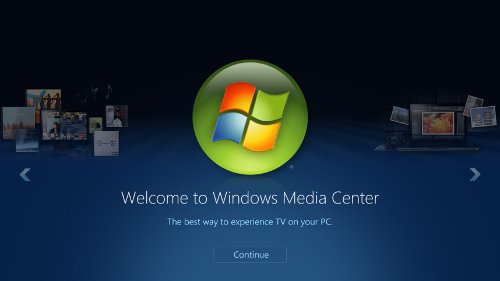
- Open the Media Centre application by pressing "START" on your remote control or by selecting "Media Center" in the "START" menu under "Programs" or "All Programs" (bottom left-hand corner of screen) or "Windows Accessories" for Windows 10. If this is the first time you have run Media Center then you will be presented with this screen (if you have already run the first time wizard you can skip ahead to step 3). Select Continue to start the first time wizard in Media Center.
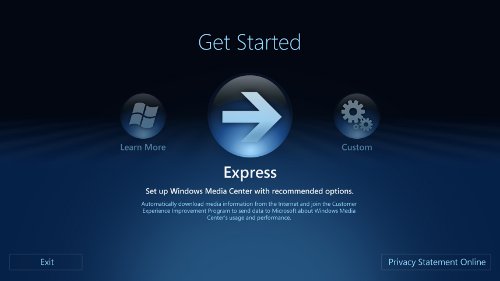
- The easiest option here is to select "Express" to allow Media Center to configure itself with the recommended settings.
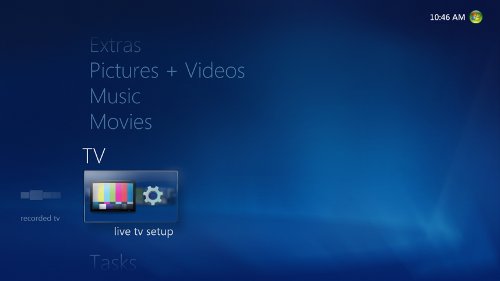
- Under the "TV" menu select "live tv setup"
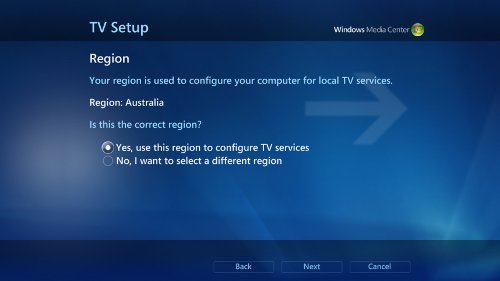
- Ensure that the listed region is "Australia" (if not select "No, I want to select a different region" and then click on Next and from the list that appears select "Australia") and select "Yes, use this region to configure TV services" and select on Next.
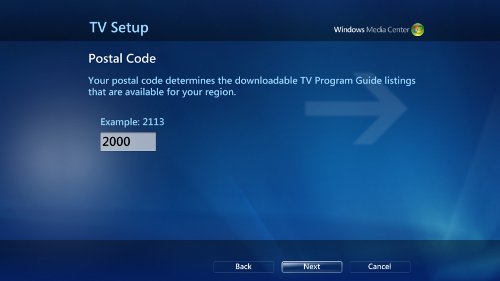
- Enter your postcode in the box provided, then select Next.
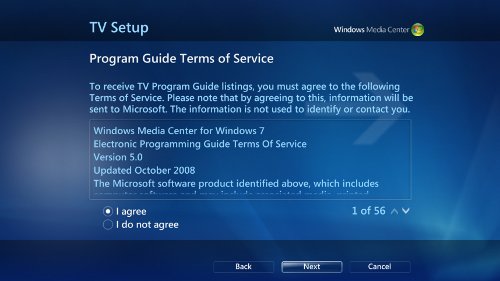
- The Microsoft "Guide Terms of Service" will be displayed. Select "I agree" and select Next.
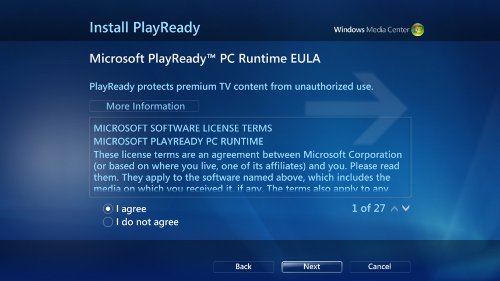
- The Microsoft "PlayReady™ PC Runtime" agreement will be displayed. Select "I agree" and select Next.
- It will show the progress while Media Center downloads the TV Setup Data. You will then see an error showing that a "Downloadable Guide Not Available", this is normal, select Next to continue.


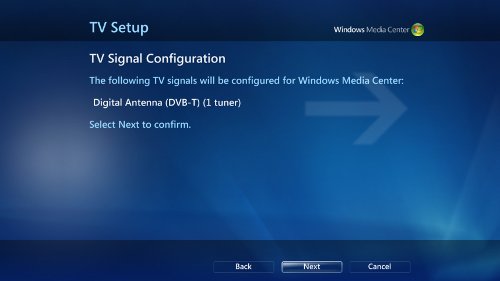
- You will then see the list of tuner cards available for Media Center to configure, if you only have one then you will see a screen like this one, if you have more than one tuner ensure that all the available tuners are ticked so that Media Center will use then and select Next.
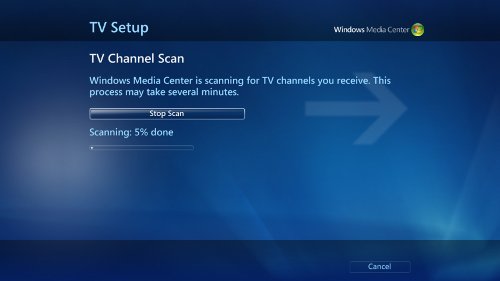
- A scan for available channels will now begin, let this finish and ensure that the expected channels are listed. If you don't see all the channels available in your area trying selecting "Scan again" to restart the scan for the rest of the channels. If you are seeing all the channels you expect to see then select Next.

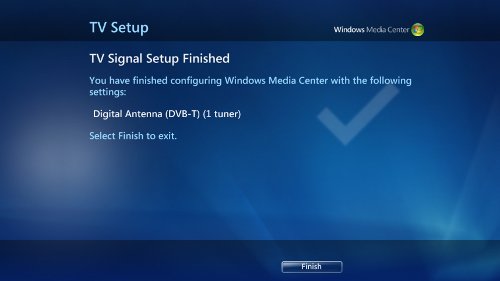
- You have now completed the TV Signal Setup within Media Center, select Finish to complete the wizard and you can now continue on with the setup of the IceTV Interactive software.
3. Downloading the IceTV software
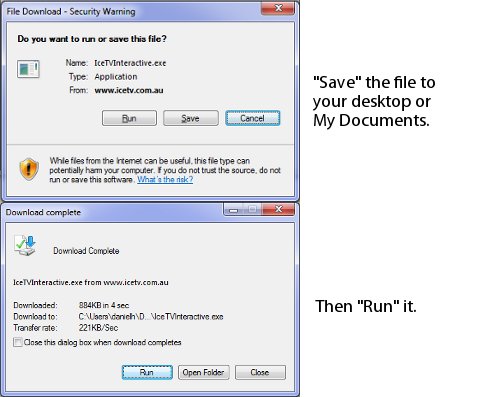
Click on the link below and select to "Save" the file to a known location on your media Centre PC (eg Desktop or My Documents). Then select to "Run" the application.
![]() Download IceTV Interactive for your Windows version
Download IceTV Interactive for your Windows version
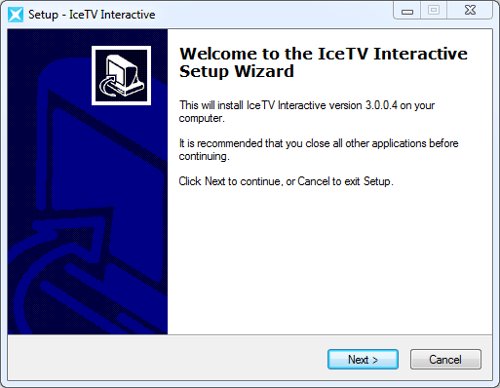
- The Setup process will then begin. Click on Next to continue.
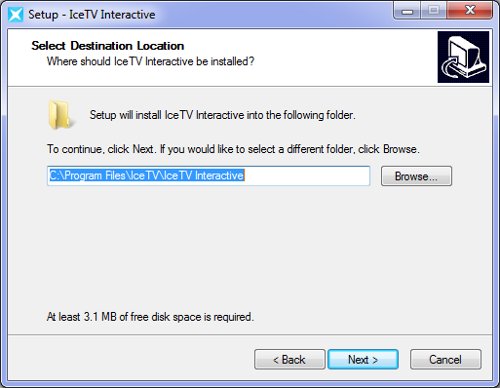
- You can generally leave the default installation directory as is, if you wish to change it you can on this screen. Click on Next to continue.
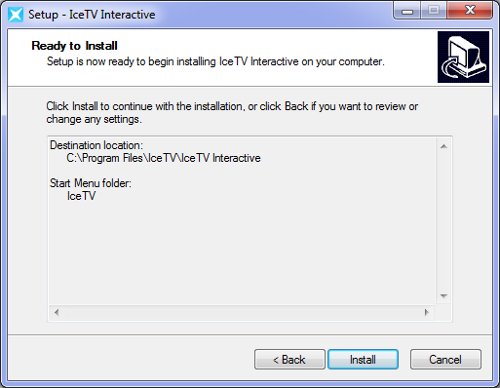
- You can generally leave the default group name for the Start Menu as is, if you wish to change it you can on this screen. Click on Next to continue.

- Click on Install to continue.
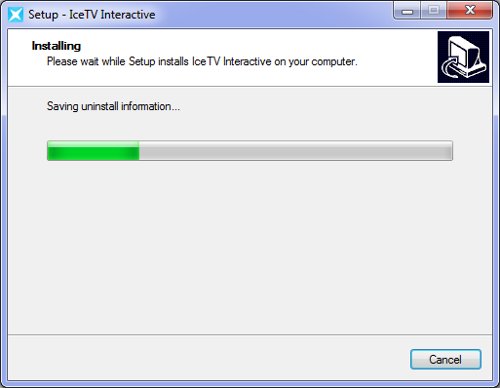
- You will see a progress bar as the IceTV Interactive application is installed.
- Leave "Launch application" ticked and then the IceTV Interactive application will load straight away ready for setup. Click on Finish to close the installation program.
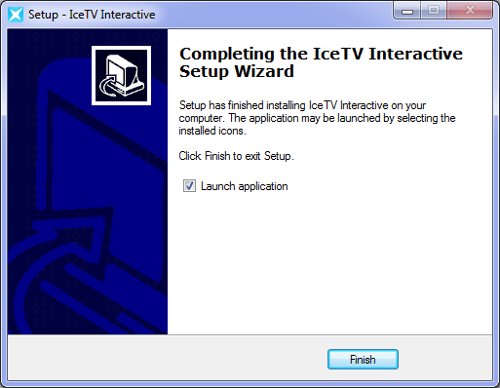
- Once this is complete you are ready to move onto the next step "Configuring IceTV Interactive for Windows 7, 8 or 8.1".
4. Configuring IceTV Interactive for Windows 7, 8, 8.1 or 10
- Load the IceTV Interactive client from the Start Menu or from the icon on the desktop. When run for the first time the configuration pages will come up on the screen.
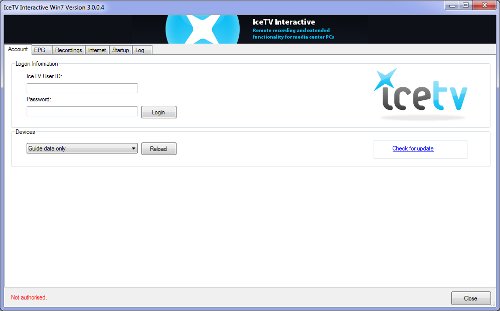
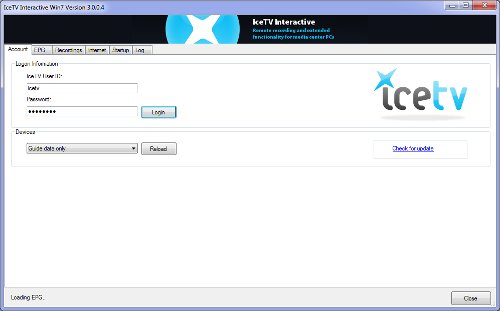
- Enter your IceTV Member ID and Password in the boxes provided and then click on the Login button.
- Select your device from the drop down list. Ensure the device type is selected (eg Win7/8 etc, MCE) NOT "Guide Data Only"

- For Interactive version 3.0.0.24 or later, tick the "Automatically synchronise data with IceTV server checkbox. Click on the "Synch Now" button to force the initial update of the guide.
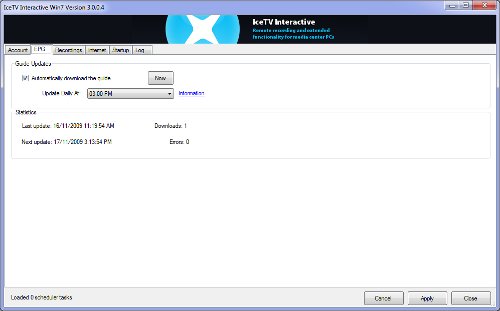
- For Interactive version 3.0.0.16 only, click on the EPG tab and ensure that the box labled "Automatically download the guide" is selected and that an appropriate time is selected from the list (IceTV recommends updates after 1 PM to ensure you always have the most up-to-date guide). Click on Now to force the initial update of the guide.
- Go to the Startup tab and ensure that all three options are ticked to allow IceTV Interactive to start automatically with the system and click on Apply. You can then click on Close to minimise the IceTV Interactive application.

- The last step is now to check the guide within Media Center and adjust channels as necessary.
5. Checking the Guide and adding the Guide listings to channels
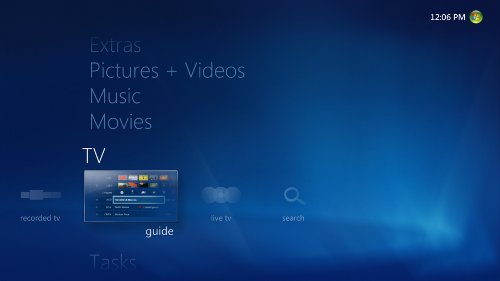
- Open Media Center and from the TV menu select Guide.
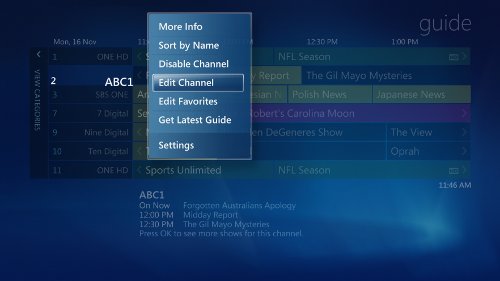
- Firstly, go through the list and look for channels that you do not want to see in the guide and disable them by highlighting the channel name. Then press the "i" button on the remote control (or right click on the mouse), from the menu that comes up select "Disable Channel".

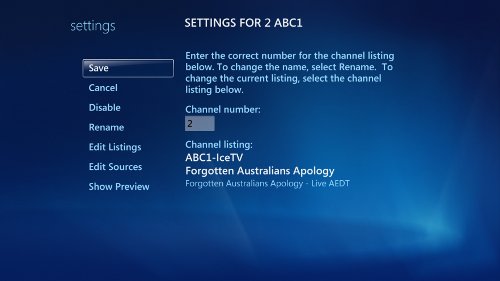
- To check or add listings to a channel that should be displaying a guide but isn't, highlight the channel name then press the "i" button on the remote control (or right click on the mouse), from the menu that comes up select "Edit Channel".

- Look under the section on the right hand side that says "Channel listing:" and ensure that the channelthat is listed has "-IceTV" after it (for example "ABC1" will be listed as "ABC1-IceTV"). If it doesn't say this then select "Edit Listings" from the menu on the left hand side.
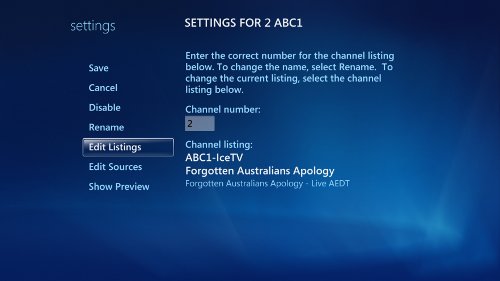
- Go down the list of available channels looking for the correct listing that have "-IceTV" after it, then select it.

- Now that the channel under "Channel listing:" is correct you can select "Save" to save these settings.
You have now successfully completed IceTV's setup procedure for Windows 7, 8, 8.1 or 10 Media Center (MCE).
The IceTV Interactive client will automatically update the IceTV Guide every 24 hours (at the time you have specified above) and inform you if any errors occur with the update.
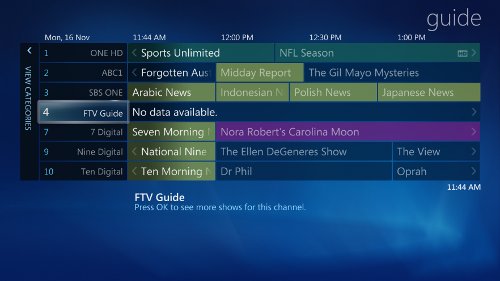
You should see a screen similar to this.
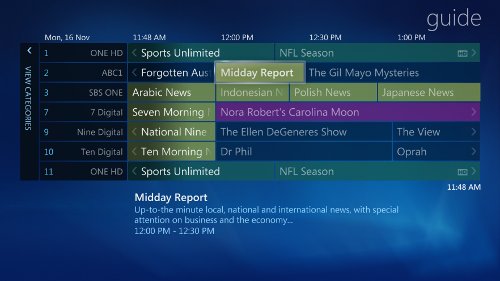
If you do not see any Guide data or a screen similar to this one please check that you have followed all the above steps correctly. If the problem still persists then please contact Customer Support.
Uninstalling
To uninstall IceTV Interactive go to the "Start" menu in Windows and choose "Control Panel". On the Control Panel window that opens select "Uninstall a Program". Highlight "IceTV Interactive" in the list and then click on "Uninstall" from the menu at the top.