This guide is for Beyonwiz DP and FV series models only. For T series Beyonwiz models see the Beyonwiz T series setup guide here.
If you have any questions about the information on this page please contact Support
Note: The instructions below assume that you have already registered an account with IceTV and have selected which TV Guide region (EPG region) you would like to receive TV guide data for. If you haven't done this or are unsure please go to My Account > Edit Details and if the region is wrong select your TV transmitter region then click on the "Save Settings" button.
You will need the following information before starting
- Your IceTV account details (what you use to log in to this website) which are the following:
- Your IceTV *member ID (also known as your IceTV username or user ID).
- Your IceTV *password.
* Notes: On a Beyonwiz DP or FV model you cannot have an @ sign or any spaces in your IceTV member ID or password. If you need to change your User ID you do it from the My Account > Account Details menu. If you need to change your password you do it from the Edit Password tab from the Account Details page. Before using any other special characters you may want to check the Beyonwiz popup keyboard to ensure that it includes the character that you want to use. We recommend just using letters, numbers, dashes and underscores. To enter numbers in a Beyonwiz menu you use the number buttons on the remote control.
Your Beyonwiz must have a connection to the Internet
- Your Beyonwiz will need to be setup and connected to your router so that the Beyonwiz has Internet access.
- You can connect your Beyonwiz to your router via an Ethernet Cable, or a pair of Ethernet Over Power devices (also known as HomePlug devices), or a Wireless Bridge (or an access point with a bridge mode).
Contents
1. Install and setup the Beyonwiz.
To use the Guide on your Beyonwiz you will first need to install and setup the device. This will involve connecting the Beyonwiz to your antenna connection, your TV and your home network. This will also include the scanning of channels and setting up a favourites list so that you can set the order of the channels in the guide. There are detailed instructions for these steps in the manual that was included with your Beyonwiz.
You are now ready to continue setting up the Guide on your Beyonwiz at section 2. Setup an IceTV Interactive Device.

2. Setup an IceTV Interactive Device
An IceTV Interactive device is needed to download the guide to your Beyonwiz PVR. When you sign up for the IceTV Guide on the website an Interactive device should automatically be created for you. The following steps will show you how to check this and set one up if needed.
- Login to the My Account section on the IceTV website.
- Click on My Account then My Recorders.
- Under "Add A Smart Recording Device" enter a name for your device in the box marked "Device Name" (e.g. Loungeroom or Beyonwiz or DP-S1).
- Set the "Device Type" to the model of your Beyonwiz recorder.
- Click "Add device"
- The page will refresh and you will get a confirmation message at the top saying the device was added and a new box will appear just in case you want to add a second device (if you only have one device to use with IceTV Interactive for remote recording purposes just leave this new box blank).
- If you want reruns to appear with some indication that they are a repeat click on the Settings button next to the device you just added, tick the "Custom repeat flag" box and set [R] or [Rpt] to the "End" of the "Title" then Save Changes. See this page for more information.
You are now ready to setup the Guide on your Beyonwiz at section 3. Setup the IceTV Guide.
3. Setup the IceTV EPG
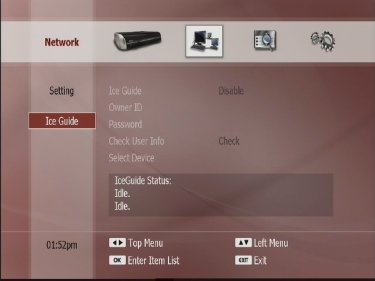
- Open the setup screen by pressing the "Setup" button on the remote control.
- Ensure that at the top of the screen the "Network" tab is selected.
- Press the down arrow until you get to "Ice Guide", Press "OK" on the remote.
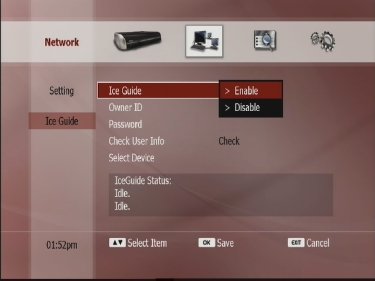
- Select "Ice Guide" and press the "OK" button, then select "Enable" using the "OK" button.
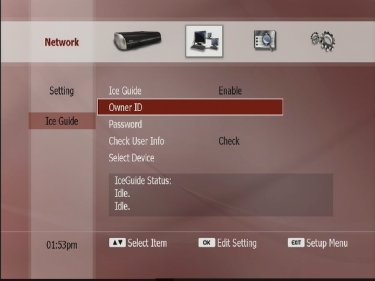
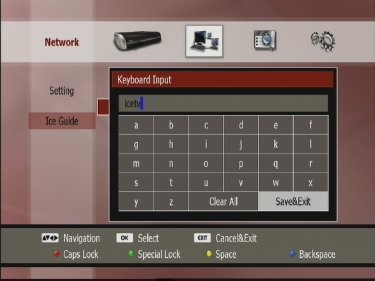
- Select "Owner ID" and press "OK", then type in your IceTV Member ID using the on-screen keyboard. When finished select "Save & Exit" to save.

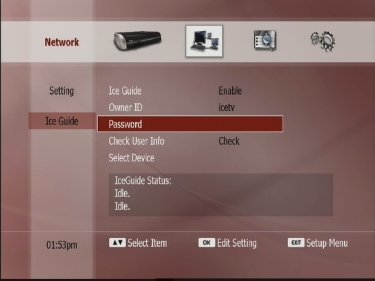
- Select "Password" and press "OK", then type in your IceTV Password using the on-screen keyboard. When finished select "Save & Exit" to save. (Please note - The IceTV Password is case sensitive, ensure that it is entered exactly as you originally typed in the IceTV website.)
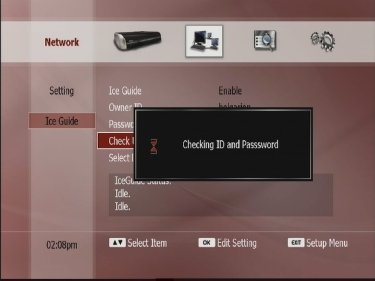
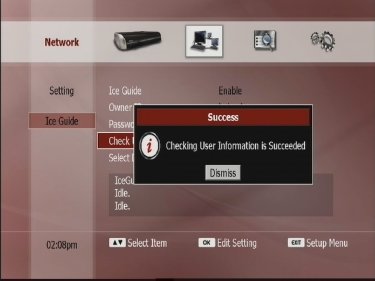
- Select "Check User Info" and press "OK", this will test communication with the IceTV server and inform you if successful or not. If unsuccessful then ensure your network is up and running and also that the IceTV Member ID and Password settings are correct.
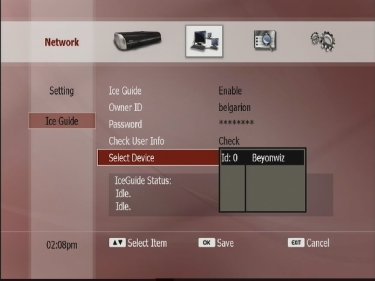
- Highlight "Select Device" and press "OK". A list of devices setup under your IceTV account will be listed, select the correct device for the Beyonwiz and press "OK" to confirm.
You have now successfully completed IceTV's setup procedure for the Beyonwiz. The Beyonwiz will automatically update the Guide and inform you if any errors occur with the update.
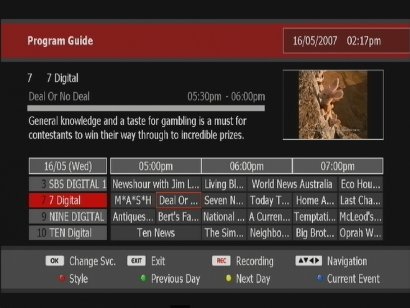
To view the TV Guide, press the "GUIDE" button on the remote control. You should see a screen similar to this.
If you do not see any TV Guide data or a screen similar to this one please check that you have followed all the above steps correctly. If the problem still persists you can check our Beyonwiz Help Articles or contact Support.
